|
COMMENTARY
NOTES CONCERNING CAPT. HILL'S MAPS
CORREGIDOR AND THE
INFANTRY SCHOOL SOLUTION
Capt. Hill's paper deals with two
actions - the attacks down James Ravine (17-19 February) which he deals
with briefly, and the attack by E Company towards Wheeler Point (23
February) into which he goes into some detail.
His writings consider careful
consideration, but must be read with a caveat in mind, and a critical
eye. They are not a source for contemporaneous historical record,
and should not be adopted uncritically into the history of the 503d PRCT
on Corregidor. This is because his manuscript was written as part of a
specific assessment process, specifically to bring out tactical
principles which were being studied as a part of the Advanced Officer's
Course at Ft. Benning. There is no weighing of tactical principals
against historical accuracy. Some accounts of fire support and attack
can be added or altered in order to bring out tactical principles. The
bottom line is the 'school solution' and not historical truth.
Further, a comparison with
other witness accounts indicates that embellishments, speculations and
fanciful episodes are contained in his manuscript. That Hill comes out
of this with a more positive stature is perhaps no accident.
The caveats have been dealt with at
length by the authors.
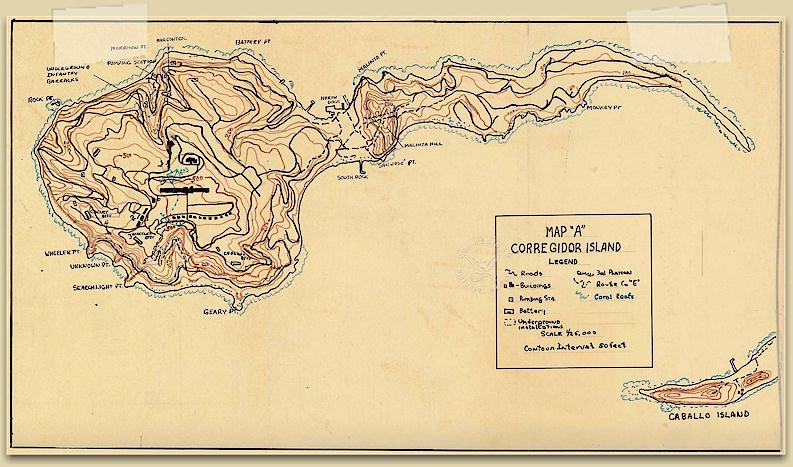
Hill's maps, which well reflect his
text, should be considered in a similar light. Hill illustrates
his ideas as to the extent to which tunnels along the South Shore Road
are connected with Battery Wheeler. This is a direct example where
tactical principals conflict with historical accuracy. There are no
connections as he illustrates them to be.
This author also feels there is a
pinch of self justification in Hill's treatment of E Company's descent
into James Ravine. The first attack starts late. It proceeds down the
east side of the ravine and walks directly into a trap sprung by
Japanese MG's dug in along the west side of the ravine. The advance is
pinned down, and a fighting withdrawal has to be made. The following
day, the plan is varied in two ways. Firstly, the attack starts after a
period of aerial bombardment, and secondly, there's an effort to send a
second force along the western side of the ravine, to deal with the MG's.
Hill does not explain why, or how, but the eastern force is again fought
to a standstill short of the point it had reached the previous day. The
outcome is rescued only by the combination of heavy mortar fire, more MG
fire, and the fire support of a destroyer in the North Channel. We are
not told what happened to the force that went down the west side of the
ravine.
Surely if one repeats a course of
action, one cannot but expect a similar outcome. So does E Company
change their plan for the third descent into James Ravine? If it was,
we're not told.
If the plan had been any different,
then it would have been well for Hill to have illustrated how the plan
was changed to increase the prospect of success. But we are not.
It is thus open to us to infer that the plan was unchanged.
Remarkably, the third attack meets
with success, not because of the fighting skill of the Paratrooper, not
because of the superior teamwork of the U.S. forces - not even because
of some fresh tactical element not present during the first two attacks.
The third attack succeeds because of one of the most incredible and
unlikely Japanese errors of WWII. I will leave the reader to uncover
this incredible turn of events himself.
I am not inclined to express any
admiration of the way E Company was commanded in James Ravine. The
'troopers fought bravely, as well as was possible, with everything they
had been given by their command. Of that, there is no doubt.
For that matter, I consider E
Company's attack upon Wheeler Point was similarly flawed. Pressing
into an attack late in the day, with ammunition low after a series of
attacks upon fortified tunnels and caves, was also gambling with fate.
It was a gamble fatal for some. Ultimately, Battery Monja was never
conquered - it was reduced as a danger, certainly, but it was never
taken, not even by war's end.
|